
If you are wondering what is a fire hydrant workout, it is a functional bodyweight exercise performed in a quadruped position that targets the outer glutes and hip stabilizers. By mimicking a dog at a fire hydrant, this lateral movement effectively isolates the gluteus medius activation to improve hip mobility and core stability.
In my fifteen years of coaching, I have seen flashy gym machines come and go, but the humble fire hydrant remains a staple. It is a unilateral training powerhouse that fixes muscle imbalances while acting as a perfect glute activation warm-up. Whether you are a marathon runner or a desk warrior, this move is your secret weapon for a resilient posterior chain.
The Science Behind the Name: Why It’s Called the Fire Hydrant
The name is admittedly a bit cheeky, as it describes the visual of a canine lifting its leg. Beyond the humor, this lateral movement is essential because it forces the hip into hip abduction within the transverse plane. Most of our daily life is linear, so moving sideways is vital for functional fitness.
I often tell my clients that looking a little silly in the gym is a small price to pay for pelvic stability. By working in this specific plane, you engage the stabilizer muscles that usually slumber during standard lunges. It is about waking up the muscles that keep your pelvis alignment neutral during high-impact sports or long walks.
Muscles Worked: More Than Just Your “Butt”
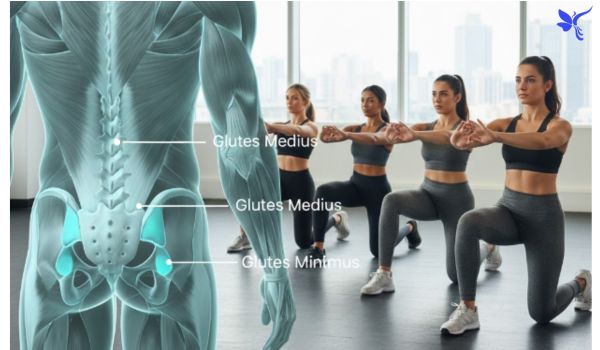
While most people perform this to tone their backside, the gluteal group is a complex trio. The fire hydrant specifically hits the gluteus medius and minimus, which are the unsung heroes of symmetry in strength. These muscles prevent your knees from caving in and protect against lower back pain by stabilizing the spine.
Furthermore, maintaining a tabletop position requires significant abdominal muscles engagement. Your deep core engagement keeps the torso still while the leg moves, making this a stealthy core builder. I’ve found that focusing on the mind-muscle connection here provides better results than lifting a heavy weight with poor form.
Step-by-Step Guide: How to Perform the Perfect Fire Hydrant
The Setup: Begin on all fours in a tabletop position with your hands under shoulders and knees under hips. Maintain a neutral spine and look slightly ahead of your hands to avoid neck strain. This foundation is the “ground zero” for proper form and technique.
The Lift: Engage your core and lift your right knee out to the side while keeping the 90-degree bend. Ensure your knee alignment stays parallel to the floor without tilting your torso to the opposite side. This is where you focus on hip abduction and maximum muscle engagement.
The Return: Lower the leg back to the starting position with total control rather than letting gravity do the work. I recommend an isometric hold at the top for two seconds to maximize the burn. Control during the descent is what builds real range of motion and strength.
5 Common Mistakes That Are Killing Your Gains
- Compensatory Hip Hiking: This is the “gap” most guides miss; it happens when you tilt your entire pelvis to lift the leg higher.
- Arching the Back: Dropping the belly kills the core stability and puts unnecessary pressure on the lumbar spine.
- Rushing the Reps: Speed is the enemy of muscle engagement; slow and steady wins the glute race every single time.
- Elbow Bending: Keep your arms locked to ensure the movement comes from the hip, not a shifting upper body.
- Neck Cranking: Looking up or tucking the chin breaks the neutral spine, leading to potential strain during your lower body workout.
Fire Hydrant Variations for Every Level
| Level | Variation | Key Equipment | Primary Benefit |
| Beginner | Wall-Supported | None (Wall) | Teaches pelvis alignment and balance. |
| Intermediate | Banded Hydrants | Resistance bands | Increases progressive overload and tension. |
| Advanced | Hydrant to Side-kick | Ankle weights | Maximizes range of motion and endurance. |
Fire Hydrants vs. Donkey Kicks vs. Clamshells: Which is Best?
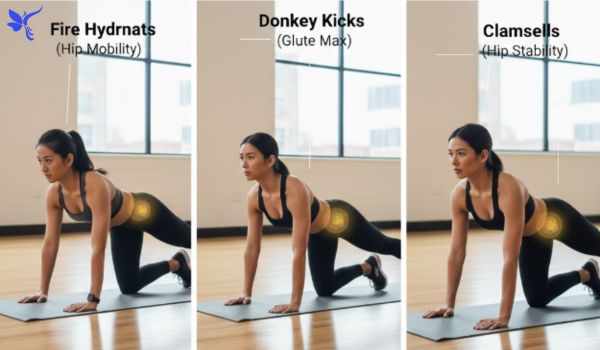
Choosing between these is like choosing the best tool in a shed; each has a specific job. While donkey kicks focus on the gluteus maximus (the “meat”), fire hydrants are superior for hip mobility and lateral stability. Clamshells are a great physical therapy exercise, but they lack the core demand of the quadruped position.
In my experience, a “trifecta” approach is the most beginner-friendly routine for total hip health. I use a 3-2-1 rule: three sets of hydrants, two of kicks, and one of clamshells. This ensures you are preventing injury by strengthening the hip from every conceivable angle and plane of motion.
The Office Worker’s Secret: Standing Fire Hydrants
Most people assume you must be on the floor, but you can do fire hydrants standing while holding a desk. This variation is a game-changer for daily activity support because it combats hip flexor tightness caused by sitting all day. It allows you to sneak in glute activation without needing a gym mat.
Standing hydrants also challenge the standing leg’s stabilizer muscles even more than the floor version. I personally use these during long writing sessions to keep my lower back pain at bay. It is the ultimate “micro-workout” for anyone trapped in a sedentary lifestyle but craving home workout efficiency.
Sample Workout Routine: How to Program Fire Hydrants
For a solid glute activation warm-up, perform 2 sets of 15 repetitions and sets on each side before your main lifts. If you are doing a home workout efficiency circuit, aim for 3 to 4 sets of 20 reps. Pair them with isometric holds to really challenge your stabilizer muscles and build endurance.
- Warm-up: 2 minutes of cat-cow to find a neutral spine.
- Active Set: 15 Fire Hydrants per side (focus on slow tempo).
- Superset: 15 Donkey Kicks to hit the full posterior chain.
- Finisher: 30-second isometric hold at the peak of the last hydrant rep.
- Recovery: Child’s pose to release any hip flexor tightness.
Conclusion
Understanding what is a fire hydrant workout is the first step toward better movement and a stronger physique. It is a versatile strength training tool that fits into any schedule, whether you have a full gym or just five minutes at home. By mastering the proper form and technique, you ensure long-term daily activity support and healthy joints.
Consistency is the ultimate “pro-tip” I can offer you today. Don’t just do these once; integrate them into your weekly routine to see a real difference in your hip mobility. If you stay focused on the mind-muscle connection, your hips and glutes will thank you for years to come.
FAQ
What is a fire hydrant workout?
It is a bodyweight exercise performed in a quadruped position where you lift your leg laterally to improve hip mobility.
What does fire hydrants workout do?
This move isolates the gluteus medius activation to strengthen the outer glutes, stabilize the pelvis alignment, and protect the lower back.
Are fire hydrants the same as hip abduction?
Yes, the fire hydrant is a functional, weight-bearing version of hip abduction that also engages the core stabilizer muscles.
Are fire hydrants safe during pregnancy?
Generally yes, they help with pelvic stability, but you should consult a doctor and avoid overextending the range of motion.
Are fire hydrant exercises good for beginners?
Absolutely, they are a beginner-friendly routine staple because they require no equipment and focus on fundamental proper form and technique.
Why do girls do hip abductors?
They target the gluteal group to build symmetry in strength, shape the outer glutes, and support overall functional fitness.

Muddasir Tahir is the founder and lead researcher at Lifestyle Dominates. With a strong passion for fitness and self-improvement, Muddasir spends his time studying human movement and high-performance habits.
His goal is to provide informational topics that are easy to understand and backed by careful research. Muddasir believes that everyone has the power to improve their lifestyle by mastering the right techniques.
When he isn’t researching new ways to help people dominate their lives, he is dedicated to building a community of like-minded individuals who strive for strength and a better mindset every day.